


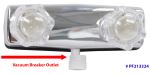
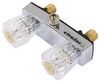
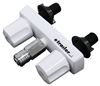
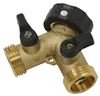
Brass RV shower valve lets you attach a handheld shower set (sold separately) so you can wash up after a long day at the campsite. Vacuum breaker makes sure that your dirty shower water won't flow backward and contaminate your clean water supply.
Features:
Specs:
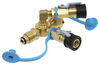
The vacuum breaker lets you attach a handheld shower set (sold separately) to make cleaning mud and sand off the kids, pets, and shower walls even easier. The vacuum breaker also has an anti-siphon device - a small air hole that drains water back out of the hose to prevent your dirty shower water from contaminating your clean water supply.
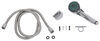
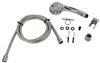
To install, use the brass inlet shanks to drop the new valve and deck plate in place of your existing valve. Then hand-tighten the included mounting nuts against the back of the wall, and connect the hot and cold water lines. You'll need to keep some tub and tile caulk (not included) on hand to help prevent any leaking.
California residents: click here
Videos are provided as a guide only. Refer to manufacturer installation instructions and specs for complete information.
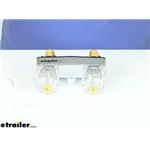
Hey everyone, I'm Ellen here at etrailer.com and today we're taking a look at the Phoenix Faucets RV Shower Valve with Vacuum Breaker. This is going to be a dual knob handle with a Chrome base. And the really nice thing about this is that it actually has brass compression valve stems. So these are going to be able to fully turn on and off, and be a lot nicer than your typical OEM parts that are just made of plastic. So we don't have to worry about our threads getting stripped out, just by installing this in place. It's going to be a lot more durable and long lasting.
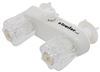
I'm just going to take the mounting nuts off and that backing plate, or the deck plate, so you can get a better look at those. So it really is made a metal, definitely a big improvement there.As far as the front of our system here, we'll have our two handles. They are labeled hot and cold, got a little red ring around the hot, blue ring around the cold. And Phoenix does recommend that you install the vacuum breaker in the down position, like I have it here. That's to make sure that that vacuum breaker does its job in preventing any kind of contamination from your shower head, from sucking up your dirty water and getting that into your clean water supply.
That's what that vacuum breaker is designed to do. It prevents any siphoning of that dirty water. So to make, most effective, you want to have it in the down position. You can install it like this, but chances are that vacuum breaker won't be as effective.It does, however, make it a little cleaner install as far as if you're going to just have your shower head coming up. And if you're never going to have a situation where that shower head is going to be submerged in water, it's probably fine.
But the whole point of that vacuum breaker is to prevent that. So just something to keep in mind there. If you do decide to switch this over and you want to keep the hot handle on the left side and the cold and the other, you can just pop these little caps off to switch them around. So just a couple of notes on how to do that.Now, as far as our measurements, we will have our two stems to install. The distance between those senators center is four inches.
The outer diameter for each one is going to be 13 sixteenths, so just over three quarters of an inch. The inner diameter is a half inch, and that's the same for both. The distance that this goes back, or the length of our threads, is an inch and a half. The total length for the unit is going to be four and a half inches. And from the top of our handles to the bottom of the base is going to be three inches, so that's how far it's going to stick out from our wall. Our base measures six and a quarter inches long, from end to end. It kind of bows out a little bit on either sides, that's how we get that six and a quarter measurement.The base is about two inches wide all on its own. With that vacuum breaker, it's about two and three quarter inches wide. So the vacuum breaker sticks up about three quarters inches, or about five eighths inches from the top of our unit there. The outer diameter of that vacuum breaker is 13 sixteenths. So that should fit with a lot of handheld showers out there. They are sold separately. You can find a lot of options here at etrailer.com, different finishes, different styles. So definitely check those out here. While you're looking, you can also find some silicone sealant to complete your install, to make sure that you don't get any water seepage into your shower unit. We do have black and white silicone sealant available, because this does call for using tub and tile caulk, and typically that's going to be something that's silicone or latex. So you can just pick up that silicone sealant here from us at etrailer, and not have to make another stop for getting your whole setup made. Comes with a one-year warranty, certified and compliant with CSA and also the International Plumbers Association. So it should be a great addition or upgrade for any RV, fifth wheel trailer, or anything else out there. That's going to do it for our look at the Phoenix Faucets RV Shower Valve with Vacuum Breaker..


It works GREAT!
AS always everything is perfect. Great company.
Fit perfectly
Everything came in a timely fashion very well pleased
All Good!


Do you have a question about this RV Showers and Tub?
Info for this part was:
At etrailer.com we provide the best information available about the products we sell. We take the quality of our information seriously so that you can get the right part the first time. Let us know if anything is missing or if you have any questions.


Thank you! Your comment has been submitted successfully. You should be able to view your question/comment here within a few days.
Error submitting comment. Please try again momentarily.